Yesterday, I talked with my professor to clarify some things about Adaboost. One of the concepts I wasn't sure about was how a weak classifier is able to determine if an image is a license plate. How can a weak classifier be assigned a weight based on its accuracy if it doesn't even know whether an image is a license plate or not? Today, I discovered that the answer to this question is trivially simple: the weak classifier's role in Adaboost is NOT to determine if an image is a license plate or not --the image is already classified before-hand. Adaboost is used not in the detection process but in the training process. Adaboost simply constructs a good detector from many smaller detectors using images that contain ONLY a license plate or ONLY no license plates.
How Adaboost Works
From what I have read so far, I will attempt to describe how Adaboost works in the context of license plate detection (LPD). The main purpose of Adaboost is to take a bunch of weak classifiers and create a single strong classifier from them. Each weak classifier is pretty good at detecting a single feature of an image, such as a vertical line in the upper-left corner of an image.
Initialization
In its most simplified form, Adaboost receives several different inputs:
1) positive training set: This is a set of images of ONLY LICENSE PLATES.
2) negative training set: This is a set of images of ONLY NON-LICENSE PLATES, such as a picture of trees or other background objects.
3) weak classifiers: This is a set of classifiers, each of which will detect a single feature in an image with a success rate of slightly greater than 50%. For license plates, this could include thousands of different classifiers that take different derivatives in different parts of an image. In Dlagnekov's thesis, he divided an image into 7 different parts and each classifier would detect a different feature in a different part of the image.
4) a set of default weights (one for each classifier): these are initialized to some default value such as 1/(2 * # of license plates). These weights will be adjusted by Adaboost during training.
Training
With these inputs, Adaboost is trained in the following way:
For X amount of rounds
____For each weak classifier
________run for each positive training image.
________run for each negative training image.
________compute and store the error for the current weak classifier
____End for
____Find the classifier that had the best detection rate (had the lowest error) and save it to build the strong classifier.
____Adjust the weights of the other weak classifiers based on the error rate: new weight = old weight * ( error / (1 - error) )
End for
The error rate for each weak classifier is determined based on the number of positive training images it returns "true" for and how many of the negative training images it returns "false" for (meaning a score for how many images were classified correctly).
As a result of boosting, only the best weak classifiers are kept. These are combined into a "strong" classifier. The strong classifier consists of simply running all of the weak classifiers on an image, multiplying the weights by these results, and adding them all together. For example, say we have a strong classifier consisting of 2 weak classifiers. The weak classifiers have weights of .6 and .3, respectively. When run on a license plate image, the first weak classifier detects its license plate feature so it outputs a "1". The second weak classifier doesn't detect its license plate feature so it outputs a "0". The result from the two weak classifiers would be .6( 1 ) + .3( 0 ) = .6. If this number is greater than or equal to (.6 + .3) * (some threshold) then the final result from the strong classifier would be "true". Otherwise, the output from the strong classifier would be "false".
Detecting the Letter "e"
In order to help me to fully understand Adaboost, my professor suggested that I create an Adaboosted algorithm for detecting the letter "e" on a sheet of paper. I will spend the next week implementing this while I help enable Robart to capture video footage.
Tuesday, January 24, 2006
Monday, January 23, 2006
So Far...
I've been out sick for a little more than a week. I am almost completely well again and will resume researching.
I will attempt to summarize everything that has happened so far with regards to my work.
Last Tuesday, January 10, my primary contact came back to work after being sick. He showed me how to interact with the robot that I will be working with.


I will attempt to summarize everything that has happened so far with regards to my work.
Last Tuesday, January 10, my primary contact came back to work after being sick. He showed me how to interact with the robot that I will be working with.
Introducing Robart III
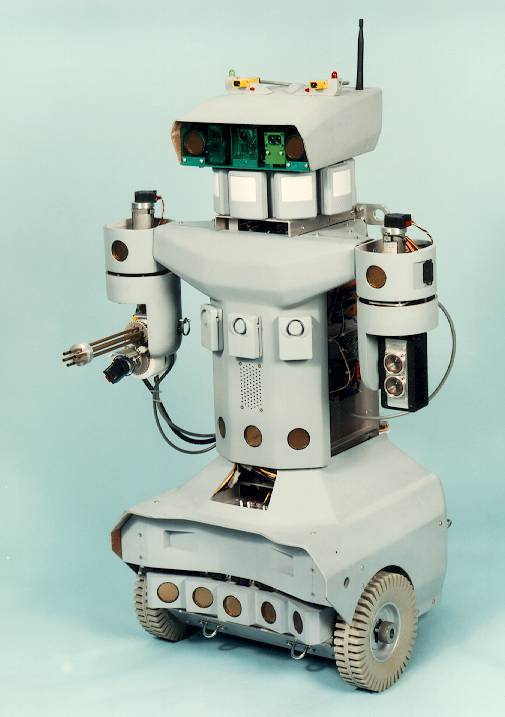
The robot's name is Robart III and is named after Dr. Bart Everett. Here is some background on Robart III:
http://www.nosc.mil/robots/land/robart/robart.html#Robart3
I am very fortunate to be working with Robart III to detect soda cans. He is allegedly one of the most sophisticated mobile robots in the world for use as a research platform. He has been featured numerous times on the Learning, History, and Discovery Channels and is ranked #16 out of Wired Magazine's list of the top 50 greatest robots ever:
http://www.wired.com/wired/archive/14.01/robots.html?pg=2
Robart's Gun

Although his gun looks like a m134 “minigun” it is actually just a 6-shot air rifle that shoots little darts or rubber pellets. This will make testing my soda can detection project more exciting! Here is some footage of Robart III shooting soda cans with his rifle in a very controlled environment. This was done before I arrived. In this video, the soda cans are set at a fixed distance, with no background clutter, in a plywood box which would minimize the effects of ambient lighting on the detection process. I believe that a simple cross-correlation is taken to determine if soda cans are being detected. My implementation will hopefully be much more robust and will integrate well with Dlagnekov's LPR/MMR (License Plate Recognition / Make Model Recognition) code.
http://www.nosc.mil/robots/movies/rob3coke.mpg
Here is a video of Robart shooting balloons.
http://www.nosc.mil/robots/movies/robart3.mpg
Robart's Vision Computer
Robart has several computers to perform different functions. The computer I will be working with is his vision computer, which is stored in his head. His vision computer consists of a Pentium 3 CPU mounted on a stackable computer where extra peripherals can be added on by literally stacking them on top of each other. This allows the computer to be expanded upward without taking up any extra space around it. To log into the computer, I simply run a standard CAT5 network cable from Robart to my laptop and use SSH.
Status of Louka's Code on Robart
Last quarter, Stephan and Kevin ran Dlagnekov's LPR/MMR software on Robart. They took a stripped-down distribution of Linux and stripped it down even more so it could run on Flash Memory (the storage medium for Robart) without burning out the cards from excessive read/write accesses. This was then installed on Robart's vision computer. Stephan and Kevin also developed code to take video footage from Robart, run Dlagnekov's LPR/MMR code on it, and create a video file with the detected license plate locations outlined.
Stephan and Kevin worked mostly on their own computers and generated a binary file to run on Robart. We uploaded this file along with the appropriate libraries to Robart and attempted to run Dlagnekov's LPR/MMR code with Stephan and Kevin's code. Unfortunately, we were unsuccessful due to the fact that Stephan compiled the library file with a different version of g++ than that which was installed on Robart.
When I got home, I emailed Robart's output to Stephan and requested that he send his source code to us so we could recompile it. Stephan was very helpful and emailed the code to me, along with the successful output from running the code on his machine.
While I was at home, I installed OpenCV and ffmpeg on my laptop in hopes that I could run Dlagnekov's code and Stephan and Kevin's library file on my laptop. When I came in to work, I found that I was missing some libraries for OpenCV and ffmpeg so we copied them from his computer onto my laptop.
So far, we have not been successful in running Dlagnekov's LPR/MMR code on Robart or my laptop. In order to move forward with my project, I have downloaded the USBVISION library to my laptop. Once this works on either my computer or his, we can then transfer our USBVISION setup to Robart. This will enable me to begin building my training set of soda cans and acquire footage for testing.
The Applicability of Dlagnekov's Thesis to Soda Can Detection
In between the software compatibility problems, I have been continuing to read Dlagnekov's Master's thesis on LPR/MMR. I am almost finished with it and have taken copious notes. Throughout my reading, I have noticed many aspects of Dlagnekov's project that are specific to license plates and cars but may not work well for soda cans.
One thing I noticed is that Dlagnekov builds a training set of license plates taken at 3 separate distances. Since the cars are recognized from the rear as they are driving away, there is a good chance that the license plate will match at least one of these three sets of images. In my soda can detection project, the soda cans will be stationary. If Robart zooms in on a soda can, then the soda can could be matched from a training set of 3 different soda can sizes. Herein lies the problem: how can Robart zoom in on a soda can without detecting its presence in the first place? Although I have so far come up with more problems than viable solutions to them, this is at least helping me to understand the present framework more thoroughly. By anticipating these problems early on, I can begin to explore the possible role that other research findings, such as SIFT with its scale and rotation invariance, can take to help with soda can detection.
Tuesday, January 10, 2006
Catching up...
Hello,
I started work on monday. My primary contact was out sick. I instead spoke with my secondary contact. She showed me to the workstation I would be using and introduced me to a few people who work there. Unfortunately, my workstation did not yet have internet access. I'm assuming that the workstation has not been used for a while and has been disconnected. She was nice enough to download Louka's thesis on car recognition to a USB drive which I then transferred to my laptop. I spent the next 3.5 hours or so reading over Louka's thesis, taking notes on it, and coming up with questions to ask my professor about. Here are some vocabulary words of interest, placed in the context of Louka's paper:
LPR: License Plate Recognition
MMR: Make and Model Recognition (referring to the make and model of cars)
Strong Classifier: a window that is placed over all possible locations in a given frame. The strong classifier returns true if the frame contains a license plate and false otherwise. Whether the strong classifier returns true or false is determined by weighing the decisions of many weak classifiers.
Weak Classifier: Given the contents of a strong classifier, a weak classifier detects the presence of a single feature. The weak classifier returns true if the feature is detected and false otherwise.
Feature: A feature is a single detail in an image, such as the x-derivative or y-derivative, that aids in the detection process.
Subscribe to:
Posts (Atom)