http://members.cox.net/fbirchmore/goodrun.mpg
http://members.cox.net/fbirchmore/goodrun2.mpg
http://members.cox.net/fbirchmore/goodrun3.mpg
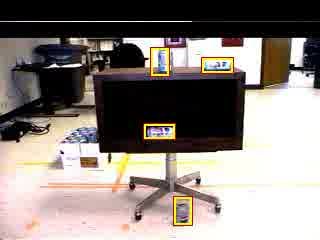
We ran my soda can detection algorithm on live video from Robart III. Apparently, the classifier I have trained is very susceptible to variations in lighting and background clutter that was not present in the training data. Regardless of the aforementioned deficiencies in this particular classifier, it does quite well at eliminating almost all of the background clutter in the center of the image (only a central portion of the window is scanned as mentioned in a previous post). These false positives could be passed to another detection method for further processing or to signal to Robart III that he should zoom in on these areas for further inspection. From the results I have observed so far, I think weak classifiers that are better at detecting unique features of soda cans would work better than the haar-like features used. I think that a SIFT-based detection method will work much better , partly because it uses keypoints that would be more invariant to changes in lighting. Investigating a SIFT-based detection method will probably be the next step I will take. Although I still need to read more about SIFT to understand it fully, I am going to investigate the possibility of incorporating Adaboost into a SIFT detection method. More information on this will appear in later blog postings.
Tuesday, April 18, 2006
Monday, April 17, 2006
Test Video
Here is the video test footage that is mentioned in the previous post:
http://members.cox.net/fbirchmore/attempt39_out.mpg
http://members.cox.net/fbirchmore/attempt39_out.mpg
Success (under constrained conditions)
 When I had finished extracting soda-can images for my training set, I had 410 vertical and 420 horizontal soda can images. I then randomly offset each of these images by up to 1/8 of their width and 1/4 of their height to generate a total of 4444 positive training examples of vertically-oriented soda cans and 4554 positive training examples of horizontally-oriented soda cans --as Dlagnekov did in his thesis.
I then trained two classifiers using 23200 negative training examples for each. Instead of using the entire labeled image, I constrained my negative training examples to a 161x184 pixel subwindow in the bottom-center of the image. Furthermore, I used negative training examples from video footage that contained no soda-cans to begin with --rather than extracting negative examples from labeled images that exclude areas marked as containing soda cans. The first classifier used only the vertically-oriented soda-can images with a detection-window-size of 17x27 pixels and the second classifier used only the horizontally-oriented soda-can images with a detection-window-size of 30x14 pixels. The I then modified the existing license plate detection code to read in a list of classifiers from a file and run them sequentially on the source video.
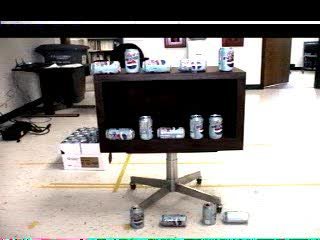
Using this new framework, I ran my detection algorithm on a sample video that I had set aside before training. This sample video footage was taken using the same background that was used to build the training set. Every soda can in the video was detected very accurately with no false-positives. The worst detection in this frame is probably the upper-left where the detection window is off-center. This is probably due to the fact that the detected locations are clustered, which might be causing surrounding detection areas to average to an off-center detection area. The next step is to test this algorithm on ROBART III using live video footage.
Thursday, April 06, 2006
Building a New Training Set
Next week, a portion of my work will be submitted into our Code's SPIE conference paper. Although I have decided to explore a SIFT-based method for soda can detection, my more immediate goal is to make the most of Dlagnekov's LPR detection algorithm when applied to soda can detection. The Robotics Code at SPAWAR would like to place my soda can detection algorithm directly on Robart III to test the algorithm's efficiency and accuracy. In order to make my algorithm "Robot Friendly", I am going to refine its focus to detect soda cans at a single scale against a static background. This way, my chances of success in reducing the false positive rate and increasing the true positive rate within the next week are much greater than they are for detecting soda cans at multiple scales. Furthermore, I will limit the number of orientations to only two --upright and horizontal. This will require me to train two separate strong classifiers. By keeping my detection method simple, I will be able to place my classifier directly on Robart III without having to recompile anything as well. If this is successful and there is enough time, I will add additional functionality to my algorithm and possibly get Robart III to shoot at the soda cans he sees (using all six barrels of course).
Setting Up The Soda Cans
 As illustrated in the photo above, I set up Diet Pepsi Cans on and around a wooden box. This wooden box has been featured in previous SPIE conference papers submitted by the Robotics Code at SPAWAR because it is safe for Robart III to shoot at it. Without modifying the position of the wooden box or the background, I placed the soda cans at different locations and Greg recorded each setup for 5-10 seconds using Robart III's head camera. I then rotated each soda can by about 60 degrees and Greg recorded this new setup as a separate MPEG file. This was repeated 44 times to create 44 different MPEG videos. When setting up soda cans, I tried to make sure that there was just about the same number of horizontally and vertically-oriented soda cans with which I can build my training set.
Extracting JPEG Images from MPEG Videos
I used ffmpeg to extract 1-2 JPEG files from each of the 44 MPEG videos. I used the following ffmpeg command for each MPEG video:
ffmpeg -ss 00:00:03 -t 00:00:01 -i ./
Changing my mind...again...
I've decided to use the Java program. Apparently, in order to upload images to LabelMe, the images must be placed online and a link must be emailed to
Bryan Russell and Antonio Torralba at MIT. Since I am under time constraints to meet a paper deadline next week, I am just going to use the Java program. Later, when I try a SIFT-based implementation, I may use LabelMe.
Bryan Russell and Antonio Torralba at MIT. Since I am under time constraints to meet a paper deadline next week, I am just going to use the Java program. Later, when I try a SIFT-based implementation, I may use LabelMe.
Changing my Mind...Decided to use LabelMe
I've decided to use MIT's LabelMe annotation tool to rebuild my training set. At first I was hesitant to use LabelMe because I found out that their Matlab toolbox doesn't actually let you annotate images --that must be done online. I only have one copy of Matlab which is installed on a Windows machine. At this point, I would prefer to keep everything within Linux. However, I see a definite advantage to using LabelMe in that multiple people can label a set of images simultaneously since LabelMe is an online annotation tool. This means that I don't necessarily need to sit down all by myself and label images --I can solicit help. Here is the LabelMe website:
http://people.csail.mit.edu/brussell/research/LabelMe/intro.html
Wednesday, April 05, 2006
Getting Java to Compile
Well, with a new Linux installation comes a new set of problems. I was initially unable to compile any Java programs short of a single file containing a single "main" function (no object definitions). I kept receiving the error message below:
javac ./Javimapper.java
java ./Javimapper
Exception in thread "main" java.lang.NoClassDefFoundError: ./Javimapper
I eventually fixed the problem by referring to the following website:
http://www.cs.princeton.edu/introcs/11hello/linux.html
Upon reading the webpage above, I simply typed in the following and I was able to compile and run the program just fine:
java -classpath ./ Javimapper
Finding an Image Annotation Program
Rebuilding the Training Set
After I lower the false positive rate on my soda can classifiers, I plan to try some sort of SIFT-based approach to detecting soda cans and other objects as well. Before attempting to lower the false positive rate, I need to rebuild the training set...again. I believe that the horizontally-oriented soda cans that I have been extracting from my training footage are throwing off my detection rate. Furthermore, I have been mistakenly training classifiers using 720x480 resolution BMP images extracted from the training MPEG movies.
At the time, I was using Adobe Premiere to extract video frames since I had not yet set up ffmpeg and it had not occurred to me to use it. In order to use Adobe Premiere, I had to convert the MPEG movies into an AVI format that was at 720x480 resolution by default. I did not notice this and mistakenly thought that the original footage was 720x480 resolution when in fact it was 320x240.
By rebuilding the training set, I will be able to use smaller sliding windows for each classifier which should reduce both the training and detection times by quite a bit. When the original footage was accidentally resized to 720x480, I believe that the pixels were blurred. It will be interesting to see how much the detection rates are affected by using unmodified 320x240 footage. The 320x240 footage probably contains a greater amount of noise. However, the 320x240 footage will also train faster with each image taking up less memory --which will probably allow me to use a greater number of negative training examples and allow more bootstrapping operations with false positives.
Since I will probably soon be applying some SIFT-based approach to soda can detection, it would be beneficial if I use bounding-polygons instead of bounding-rectangles. I think this helps SIFT to avoid mistakenly extracting features from the background and allows the spread of detected points to be exploited. With this in mind, I finally decided to create a Java GUI program that will allow the user to specify bounding polygons that will be saved into different files. I will then write some code to determine the extreme points (i.e. max x, min y; max x, max y; etc...) of the polygons and set these to be the corners of rectangular bounding boxes. I will then use these bounding boxes to retrain some strong classifiers. The polygon data can then be saved for later use with SIFT or some other algorithm that would benefit from tight-fitting polygons.
Java Program to Modify
I found this Java program online by searching for "image map java" on Google. The potential candidates for image annotation programs seemed overly complex and generally only used bounding boxes. I realized that image maps that one might find on a website would use the same sort of image annotation as "image annotation toolbox" programs. I wanted to avoid using Matlab since I am less familiar with its object-oriented features than Java and I can only use Matlab on my laptop.
Here is the program I will modify:
http://www4.vc-net.ne.jp/~klivo/mapo/javimap.htm
It seems to work extremely well --especially for a 7-year-old program. I will most likely modify it by allowing it to load all images from an entire directory and making it export bounding box data in addition to polygon data.
Getting Java to Work
I took the following steps to get Java to work on my USB Hard Drive:
1) download JDK binary from Sun's website
2) type the following:
sudo apt-get install fakeroot java-package java-common
sudo dpkg -i JDK1.5.deb
sudo update-alternatives --config java
I then picked the new Java version from the menu that appeared from the update-alternatives command. I found this information at the following website:
http://www.ubuntuforums.org/archive/index.php/t-76735.html
Fixing FFMPEG
I was having trouble compiling and running the lpr_vhook program that Stephan and Kevin created. It was unable to find the highgui portion of the OpenCV library. Greg finally got it working by linking highgui.a directly into the program instead of using the shared library files. He also linked some other files that were missing by adding them to the Makefile. Apparently, my problem was that I downloaded a newer version of ffmpeg that had new library requirements so these had to be added. The ffmpeg website had removed their .tar files so I had to use their CVS repository to get the "bleeding edge" version of ffmpeg.
I learned a few new terminal commands in Linux:
ldd : list library dependencies for a file
!ff : runs most recent command that begins with the letters "ff"
history : list all commands that were typed into the terminal and enumerate them
!# : run command from "history" that has the number #
Even though it took me a week, booting Linux from a USB drive has payed off immensely in that it eliminates the need to reconfigure each Linux environment for each computer with Linux installed.
Now, I can finally redo my training set using 320x240 resolution and excluding horizontally-oriented soda cans. I may exclude partially occluded soda cans as well.
Getting X11 to work
I had some trouble getting X11 to work when I attached my USB drive to my work computer. I was getting weird colored snow instead of graphics. After trying many different things, I finally installed the proprietary nvidia drivers instead of the open-source driver called "nv". By refererring to this website, I was able to install these drivers quite easily:
http://www.ubuntuforums.org/showthread.php?t=75074&page=4
I typed in the following instructions into a terminal window:
It worked so I have X11 now.
http://www.ubuntuforums.org/showthread.php?t=75074&page=4
I typed in the following instructions into a terminal window:
sudo apt-get install nvidia-glx linux-restricted-modules-$(uname -r)
sudo nvidia-glx-config enable
It worked so I have X11 now.
Tuesday, April 04, 2006
Installing Linux to a USB hard drive
I recently purchased a Seagate 250GB hard drive and an Acomdata aluminum external hard drive USB/Firewire case. I use a nice Dell PC at work that only has Windows installed on it. Rather than trying to reformat and repartition this PC at work, I decided to attempt to install Ubuntu 5.10 to an external USB hard drive. This way, I can bring my own personal Linux distribution wherever I go and use it on any PC (given the motherboard supports booting from a USB device) without changing the contents of the PC's hard drive. I got this to work by following the instructions provided in this article:
http://www.ubuntuforums.org/showthread.php?t=80811
In case this Ubuntu Forum post gets deleted, I have copied and pasted the appropriate steps below. My installation experience was slightly different from the original steps mentioned in the forum --I have indicated these differences with bold,italic, light-blue text.
***********************************************************************************************
Here is what I do to successfully load UBUNTU v5.10 on my EXTERNAL USB DRIVE ...
(Step 0 ) Plug the external USB drive into the computer. Unplug all of the internal IDE hard drives.
( STEP 1 ) Instead of using "expert" mode to install, I just hit enter to start the install process (using the install CD ... NOT the live CD).
INSTALL NOTE: The installation process will ask you for some information when it starts up ...
first it will ask for your language,
then your (language) location,
then your keyboard type,
then it will detect your cdrom(s),
then it will attempt to detect your network configuration,
then it will ask you to give your PC a name (hostname),
then it detects hardware and starts up the partition phase of the install.
INSTALL NOTE: When you get to STEP 2 (the partition phase), there is a simple way to determine how the install program assigns device names to your hard drive(s). Before starting any partitioning activity in STEP 2, choose the GO BACK option in the lower left corner of this screen and then choose EXECUTE A SHELL farther down in the Ubuntu installer menu that appears. Choose CONTINUE at the next prompt. In the shell window that appears, type in fdisk -l (that is FDISK -L in all lowercase). This will give you a list of all the storage devices the installer program sees. Make a note of the device names (/dev/hd? or /dev/sd?) and then type in exit to return to the partition phase (STEP 2) of the install. (Kudos to "RyanGT" for suggesting this in post #257.)
( Step 2 ) (ignore the Step 2 below) If you have a 250GB hard drive like I do, you probably don't want Ubuntu to create 3 giant partitions that span the entire drive. In fact, you will probably want to set up separate partitions manually. I set up my partitions as follows:
Filesystem Size Used Avail Use% Mounted on Fs
/dev/sda1 122M 19M 97M 17% /boot ext3
/dev/sda2 449M 255M 171M 60% / ext3
/dev/sda3 1.5G swap swap
/dev/sda5 95M 33M 62M 35% /tmp reiserfs
/dev/sda6 1.9G 492M 1.4G 26% /var reiserfs
/dev/sda7 1.9G 33M 1.9G 2% /usr/local reiserfs
/dev/sda8 5.6G 1.6G 4.1G 29% /usr reiserfs
/dev/sda9 28G 653M 28G 3% /home reiserfs
(note: I displayed this information by later typing "df -h" in a terminal window. sda4 is not present because it represents the extended partition
of the drive where sda5 - sda9 are within sda4)
I made sure that the /boot partition was small so that it does not exceed the first 1024 cylinders at the beginning of the hard drive --which I guess would make this partition not bootable.
skip this -- ( STEP 2 ) During the partitioning phase, I let the install program format my external USB drive. (I believe UBUNTU calls this a guided partitioning ... which sets up an ext2 or ext3 partition and a swap partition for you.)
INSTALL NOTE: Look for the line during the partitioning phase that might say ... erase entire disk SCSI (0,0,0) (sda). Be careful here as some people have had problems when choosing any partitioning options that include the text "and use LVM" (Kudos to "brucetan" for sharing this in post #268.)
Feel like learning about LVM anyway? Check this link out. (Kudos to "SD-Plissken" for sharing this info.)
BE VERY CAREFUL on these screens to choose the correct SDA drive and NOT an HDA drive or you may unintentionally format another drive in your system. There is no undo button for this!
Once again ... BE 100% SURE OF THE DRIVE YOU WANT TO FORMAT!
( STEP 3 ) When the install gets to loading the GRUB bootloader ... DO NOT LET IT LOAD TO ANY OTHER DRIVE BUT THE EXTERNAL USB drive we are working with here. -- This doesn't matter since the other drives should be disconnected.
Say YES when asked if you want to install Grub to the MBR (since the USB drive is the only one connected --ignore where is says "say NO" below)
The install program will ask to load GRUB to the master boot record (MBR) of your internal hard drive (HDA). Say NO to this, and on the next screen, type in the correct path to the SDA (external USB) drive where we want to install the GRUB bootloader.
(Mine was /dev/sda [NOT sda1] ... but yours may be different depending on the number and/or types of drives in your system)
COMMENT: I loaded GRUB to sda (the bootsector of the external drive) and NOT to sda1 (which would be the first partition on the external drive).
INSTALL NOTE: at this point, the install program loads some stuff and ejects the CD ... wanting you to do a reboot.
( STEP 4 ) BE 100% SURE to leave the CD in the drive (and close the drive door) before rebooting. When the PC reboots, type in rescue (to load UBUNTU in rescue mode) ( Review REQUIREMENTS at the beginning of this guide! )
Why do we startup in rescue mode you might ask? It's because we have to edit a few files to get USB support loaded before UBUNTU actually gets going. And, we also need to change a setting in the GRUB menu file to make it work correctly.
( STEP 5 ) When the system comes back up it will ask for a partition to mount. Pick the correct mount point for your external drive from the list.
(Mine was mount /dev/discs/disc1/part1 ... but yours may be different depending on the number and/or types of drives in your system)
COMMENT: /dev/discs mount points start with disc0 (with 0 meaning the first drive in a system). So, my mount point of /dev/discs/disc1/part1 was really the second disk [disc1] (the sda drive we are working with) and the first partition [part1] on that disk.
( STEP 6 ) When it comes up to a terminal window (with RESCUE MODE in the upper left corner) and just sits there, hold down Ctrl-Alt-F2 to open another terminal window for us to do our edits in.
( STEP 7 ) Type in these lines before we start editing out files ...
mount -tproc proc /target/proc
chroot /target
su
INSTALL NOTE: I used vim to edit the files. (There is a great vim cheatsheet in pdf format available from "TimL".) It is weird to use at first until you learn what a few keys do in it. The INSERT key allows you to actually enter text where you place the cursor ... The ESC key takes you out of INSERT mode ... And hitting : x saves the file and exits out of vim. (IMPORTANT TIP ... that's a colon and a lowercase x with NO SPACE between the colon and the x)
( STEP 8 ) Run vim to edit the modules file to make sure USB support is added/loaded during UBUNTU startup ...
vim /etc/mkinitramfs/modules
Right below the last line of text, enter these lines ...
ehci-hcd
usb-storage
scsi_mod
sd_mod
Be sure to save the file changes (using : x)
COMMENT: Some PCs may need a more comprehensive list added here. Please take a look at post #181 if you are having startup issues after these edits. (Kudos to "brotorious" for his efforts on this.)
( STEP 9 ) Run vim to edit the initramfs.conf file to make sure enough time elapses for USB support to load before UBUNTU gets running ...
vim /etc/mkinitramfs/initramfs.conf
At the very top of this file, add this line which tells UBUNTU to pause for 12 seconds before starting up ...
WAIT=12 (in all caps here, not sure if necessary though)
Be sure to save the file changes (using : x)
INSTALL NOTE: Editing these two files loads the necessary commands to get USB support going so UBUNTU will recognize the external USB drive. But we still need to recompile (or recreate) the initrd.img that UBUNTU uses at startup ... so that these edits actually work.
( STEP 10 ) Recompile (recreate) the initrd.img file to include USB support from these edited files ...
mkinitramfs -o /boot/initrd.img-2.6.12-9-386 /lib/modules/2.6.12-9-386
INSTALL NOTE: When you are done with the previous step #9 (and before performing this step), you can run the "ls /lib/modules" command (without the quote marks) from a terminal window to see what kernel version number you should use for this install step. They may be using a kernel version higher than 2.6.12-9-386 that was available when I originally created this help guide. (Kudos to "Saxegaard" for bringing this to my attention in post #235.)
Note: this entire step #11 might not be necessary if you disconnected the other hard drives from the computer. You may need to edit the "device.map" file though and make sure it contains the following line:
(hd0) dev/sda
If you DO end up having to edit menu.lst, make sure you type
"grub-install /dev/sda" (without the quotes of course) to update grub.
( STEP 11 ) Edit the GRUB bootloader menu file to correct a small error that looks at the wrong drive to boot from ...
vim /boot/grub/menu.lst
Navigate down this file until you get to a section where there is a menu list (not commented out ... no #s) that has Ubuntu mentioned three times (and possibly an area mentioning Windows XP down below it, if you have XP installed on an internal drive of yours).
There is a line in these three Ubuntu menu choices that has root listed on it and probably has (hd1,0) to the right of it. We need to change this to (hd0,0) on all three of these menu choices. Why? Because according to GRUB, the external USB drive will be our first drive (hd0,0) and not our second drive (hd1,0) because we loaded GRUB on it's bootsector.
INSTALL NOTE: You will also want to change a "# groot" line in a section of your menu.lst file that may look something like this ...
## default grub root device
## e.g. groot=(hd0,0)
# groot=(hd0,3) <<< groot="(hd0,0)"> until the screen actually says to press enter). Hold down Ctrl-Alt-F1 to get back to the RESCUE MODE terminal window and type exit to reboot the system.
BE 100% SURE TO GET THE CD OUT OF THE DRIVE BEFORE UBUNTU RESTARTS
( STEP 13 ) After rebooting, UBUNTU continues to run it's install process and comes to the desktop. Use the username and password you setup earlier in the install process to get into UBUNTU
That's the process I've successfully used to install UBUNTU v5.10 on an external USB drive. I hope this helps anyone whose been wrestling with this process. Let me know if it works out for you.
DAVE
Reconnect all of your hard drives and boot up the computer. (make sure you tell your bios to boot from the USB drive)
If GRUB never loads and instead gives you an error message, then you may need to install GRUB to your main hard drive. Before doing this, try plugging in your USB drive into a different computer and see if it boots up. If you need to install GRUB to your IDE hard drive, then follow the steps in this article to trick the Ubuntu installer into skipping all steps and installing only the GRUB bootloader:
http://ubuntuforums.org/showthread.php?t=76652
You can then copy the new kernel and initrd images you created in previous steps to the IDE hard drive and add them to the boot loader. To figure this out, I simply looked at other entries listed in the bootloader and applied this format to the new kernel and initrd images.
OTHER PROBLEMS AND POTENTIAL FIXES ...
* Booting Ubuntu from Windows XP without loading GRUB to the MBR ...
http://www.ubuntuforums.org/showthread.php?t=56723
(Kudos to "celticmonkey" for documenting this.)
* Problems booting XP from an internal drive ...
( message #2 ) + ( message #203 )
* Problems starting UBUNTU after a kernel update using Ubuntu's automatic update app ...
( message #112 ) + ( message #161 )
* Using Windows XP to format drives larger than 32GB AS FAT32 ...
( message #188 )
* Re-installing GRUB in a relatively painless manner ...
( message #205 ) (Kudos to "RyanGT" for hunting this down.)
* Creating a bootable GRUB CD (sketchy details but seems to make sense) ...
( message #207 ) + http://www.gnu.org/software/grub/man...D_002dROM.html
REFERENCE MATERIALS ...
* GRUB Manual (section 14.3 shows what error codes mean)
http://www.gnu.org/software/grub/manual/grub.html
__________________
( If you don't care who gets the credit ... great things can be accomplished. )
Setup Guide: "Installing Ubuntu on an external USB Drive"
Good Starter Book: "Linux Desktop Pocket Guide"
http://www.ubuntuforums.org/showthread.php?t=80811
In case this Ubuntu Forum post gets deleted, I have copied and pasted the appropriate steps below. My installation experience was slightly different from the original steps mentioned in the forum --I have indicated these differences with bold,italic, light-blue text.
***********************************************************************************************
Here is what I do to successfully load UBUNTU v5.10 on my EXTERNAL USB DRIVE ...
(Step 0 ) Plug the external USB drive into the computer. Unplug all of the internal IDE hard drives.
( STEP 1 ) Instead of using "expert" mode to install, I just hit enter to start the install process (using the install CD ... NOT the live CD).
INSTALL NOTE: The installation process will ask you for some information when it starts up ...
first it will ask for your language,
then your (language) location,
then your keyboard type,
then it will detect your cdrom(s),
then it will attempt to detect your network configuration,
then it will ask you to give your PC a name (hostname),
then it detects hardware and starts up the partition phase of the install.
INSTALL NOTE: When you get to STEP 2 (the partition phase), there is a simple way to determine how the install program assigns device names to your hard drive(s). Before starting any partitioning activity in STEP 2, choose the GO BACK option in the lower left corner of this screen and then choose EXECUTE A SHELL farther down in the Ubuntu installer menu that appears. Choose CONTINUE at the next prompt. In the shell window that appears, type in fdisk -l (that is FDISK -L in all lowercase). This will give you a list of all the storage devices the installer program sees. Make a note of the device names (/dev/hd? or /dev/sd?) and then type in exit to return to the partition phase (STEP 2) of the install. (Kudos to "RyanGT" for suggesting this in post #257.)
( Step 2 ) (ignore the Step 2 below) If you have a 250GB hard drive like I do, you probably don't want Ubuntu to create 3 giant partitions that span the entire drive. In fact, you will probably want to set up separate partitions manually. I set up my partitions as follows:
Filesystem Size Used Avail Use% Mounted on Fs
/dev/sda1 122M 19M 97M 17% /boot ext3
/dev/sda2 449M 255M 171M 60% / ext3
/dev/sda3 1.5G swap swap
/dev/sda5 95M 33M 62M 35% /tmp reiserfs
/dev/sda6 1.9G 492M 1.4G 26% /var reiserfs
/dev/sda7 1.9G 33M 1.9G 2% /usr/local reiserfs
/dev/sda8 5.6G 1.6G 4.1G 29% /usr reiserfs
/dev/sda9 28G 653M 28G 3% /home reiserfs
(note: I displayed this information by later typing "df -h" in a terminal window. sda4 is not present because it represents the extended partition
of the drive where sda5 - sda9 are within sda4)
I made sure that the /boot partition was small so that it does not exceed the first 1024 cylinders at the beginning of the hard drive --which I guess would make this partition not bootable.
skip this -- ( STEP 2 ) During the partitioning phase, I let the install program format my external USB drive. (I believe UBUNTU calls this a guided partitioning ... which sets up an ext2 or ext3 partition and a swap partition for you.)
INSTALL NOTE: Look for the line during the partitioning phase that might say ... erase entire disk SCSI (0,0,0) (sda). Be careful here as some people have had problems when choosing any partitioning options that include the text "and use LVM" (Kudos to "brucetan" for sharing this in post #268.)
Feel like learning about LVM anyway? Check this link out. (Kudos to "SD-Plissken" for sharing this info.)
BE VERY CAREFUL on these screens to choose the correct SDA drive and NOT an HDA drive or you may unintentionally format another drive in your system. There is no undo button for this!
Once again ... BE 100% SURE OF THE DRIVE YOU WANT TO FORMAT!
( STEP 3 ) When the install gets to loading the GRUB bootloader ... DO NOT LET IT LOAD TO ANY OTHER DRIVE BUT THE EXTERNAL USB drive we are working with here. -- This doesn't matter since the other drives should be disconnected.
Say YES when asked if you want to install Grub to the MBR (since the USB drive is the only one connected --ignore where is says "say NO" below)
The install program will ask to load GRUB to the master boot record (MBR) of your internal hard drive (HDA). Say NO to this, and on the next screen, type in the correct path to the SDA (external USB) drive where we want to install the GRUB bootloader.
(Mine was /dev/sda [NOT sda1] ... but yours may be different depending on the number and/or types of drives in your system)
COMMENT: I loaded GRUB to sda (the bootsector of the external drive) and NOT to sda1 (which would be the first partition on the external drive).
INSTALL NOTE: at this point, the install program loads some stuff and ejects the CD ... wanting you to do a reboot.
( STEP 4 ) BE 100% SURE to leave the CD in the drive (and close the drive door) before rebooting. When the PC reboots, type in rescue (to load UBUNTU in rescue mode) ( Review REQUIREMENTS at the beginning of this guide! )
Why do we startup in rescue mode you might ask? It's because we have to edit a few files to get USB support loaded before UBUNTU actually gets going. And, we also need to change a setting in the GRUB menu file to make it work correctly.
( STEP 5 ) When the system comes back up it will ask for a partition to mount. Pick the correct mount point for your external drive from the list.
(Mine was mount /dev/discs/disc1/part1 ... but yours may be different depending on the number and/or types of drives in your system)
COMMENT: /dev/discs mount points start with disc0 (with 0 meaning the first drive in a system). So, my mount point of /dev/discs/disc1/part1 was really the second disk [disc1] (the sda drive we are working with) and the first partition [part1] on that disk.
( STEP 6 ) When it comes up to a terminal window (with RESCUE MODE in the upper left corner) and just sits there, hold down Ctrl-Alt-F2 to open another terminal window for us to do our edits in.
( STEP 7 ) Type in these lines before we start editing out files ...
mount -tproc proc /target/proc
chroot /target
su
INSTALL NOTE: I used vim to edit the files. (There is a great vim cheatsheet in pdf format available from "TimL".) It is weird to use at first until you learn what a few keys do in it. The INSERT key allows you to actually enter text where you place the cursor ... The ESC key takes you out of INSERT mode ... And hitting : x
( STEP 8 ) Run vim to edit the modules file to make sure USB support is added/loaded during UBUNTU startup ...
vim /etc/mkinitramfs/modules
Right below the last line of text, enter these lines ...
ehci-hcd
usb-storage
scsi_mod
sd_mod
Be sure to save the file changes (using : x)
COMMENT: Some PCs may need a more comprehensive list added here. Please take a look at post #181 if you are having startup issues after these edits. (Kudos to "brotorious" for his efforts on this.)
( STEP 9 ) Run vim to edit the initramfs.conf file to make sure enough time elapses for USB support to load before UBUNTU gets running ...
vim /etc/mkinitramfs/initramfs.conf
At the very top of this file, add this line which tells UBUNTU to pause for 12 seconds before starting up ...
WAIT=12 (in all caps here, not sure if necessary though)
Be sure to save the file changes (using : x)
INSTALL NOTE: Editing these two files loads the necessary commands to get USB support going so UBUNTU will recognize the external USB drive. But we still need to recompile (or recreate) the initrd.img that UBUNTU uses at startup ... so that these edits actually work.
( STEP 10 ) Recompile (recreate) the initrd.img file to include USB support from these edited files ...
mkinitramfs -o /boot/initrd.img-2.6.12-9-386 /lib/modules/2.6.12-9-386
INSTALL NOTE: When you are done with the previous step #9 (and before performing this step), you can run the "ls /lib/modules" command (without the quote marks) from a terminal window to see what kernel version number you should use for this install step. They may be using a kernel version higher than 2.6.12-9-386 that was available when I originally created this help guide. (Kudos to "Saxegaard" for bringing this to my attention in post #235.)
Note: this entire step #11 might not be necessary if you disconnected the other hard drives from the computer. You may need to edit the "device.map" file though and make sure it contains the following line:
(hd0) dev/sda
If you DO end up having to edit menu.lst, make sure you type
"grub-install /dev/sda" (without the quotes of course) to update grub.
( STEP 11 ) Edit the GRUB bootloader menu file to correct a small error that looks at the wrong drive to boot from ...
vim /boot/grub/menu.lst
Navigate down this file until you get to a section where there is a menu list (not commented out ... no #s) that has Ubuntu mentioned three times (and possibly an area mentioning Windows XP down below it, if you have XP installed on an internal drive of yours).
There is a line in these three Ubuntu menu choices that has root listed on it and probably has (hd1,0) to the right of it. We need to change this to (hd0,0) on all three of these menu choices. Why? Because according to GRUB, the external USB drive will be our first drive (hd0,0) and not our second drive (hd1,0) because we loaded GRUB on it's bootsector.
INSTALL NOTE: You will also want to change a "# groot" line in a section of your menu.lst file that may look something like this ...
## default grub root device
## e.g. groot=(hd0,0)
# groot=(hd0,3) <<< groot="(hd0,0)"> until the screen actually says to press enter). Hold down Ctrl-Alt-F1 to get back to the RESCUE MODE terminal window and type exit
BE 100% SURE TO GET THE CD OUT OF THE DRIVE BEFORE UBUNTU RESTARTS
( STEP 13 ) After rebooting, UBUNTU continues to run it's install process and comes to the desktop. Use the username and password you setup earlier in the install process to get into UBUNTU
That's the process I've successfully used to install UBUNTU v5.10 on an external USB drive. I hope this helps anyone whose been wrestling with this process. Let me know if it works out for you.
DAVE
Reconnect all of your hard drives and boot up the computer. (make sure you tell your bios to boot from the USB drive)
If GRUB never loads and instead gives you an error message, then you may need to install GRUB to your main hard drive. Before doing this, try plugging in your USB drive into a different computer and see if it boots up. If you need to install GRUB to your IDE hard drive, then follow the steps in this article to trick the Ubuntu installer into skipping all steps and installing only the GRUB bootloader:
http://ubuntuforums.org/showthread.php?t=76652
You can then copy the new kernel and initrd images you created in previous steps to the IDE hard drive and add them to the boot loader. To figure this out, I simply looked at other entries listed in the bootloader and applied this format to the new kernel and initrd images.
OTHER PROBLEMS AND POTENTIAL FIXES ...
* Booting Ubuntu from Windows XP without loading GRUB to the MBR ...
http://www.ubuntuforums.org/showthread.php?t=56723
(Kudos to "celticmonkey" for documenting this.)
* Problems booting XP from an internal drive ...
( message #2 ) + ( message #203 )
* Problems starting UBUNTU after a kernel update using Ubuntu's automatic update app ...
( message #112 ) + ( message #161 )
* Using Windows XP to format drives larger than 32GB AS FAT32 ...
( message #188 )
* Re-installing GRUB in a relatively painless manner ...
( message #205 ) (Kudos to "RyanGT" for hunting this down.)
* Creating a bootable GRUB CD (sketchy details but seems to make sense) ...
( message #207 ) + http://www.gnu.org/software/grub/man...D_002dROM.html
REFERENCE MATERIALS ...
* GRUB Manual (section 14.3 shows what error codes mean)
http://www.gnu.org/software/grub/manual/grub.html
__________________
( If you don't care who gets the credit ... great things can be accomplished. )
Setup Guide: "Installing Ubuntu on an external USB Drive"
Good Starter Book: "Linux Desktop Pocket Guide"
Subscribe to:
Comments (Atom)